Friday, 22 June 2012

A Batman Birthday

Hi everyone!

Can't believe it's been a week since my last post. Where has the time gone?

It was my boyfriends birthday this week so I been baked him some fab little cakes for his birthday, and then we went off galavanting to Alton Towers and Drayton Manor for a little birthday treat. We didn't really think Drayton Manor was that great. It seemed more family/kiddie orientated than Alton Towers. Even the 'big' rides weren't really that big at Drayton. But we still had a nice day. Alton Towers was really busy. Considering we only went a month ago and it was dead it was a bit of a shock! It was still a ice day though and luckily the weather stayed nice :)

Right, enough of my ramblings! I'll show you all the birthday card first and then I'll get onto the batman part of the post in a bit. So here's the birthday card.


And here's a close up of the bear so you can see his little suit properly.


My camera didn't really pick it up very well but the collar of the tux is shiny, as is the olive in the Martini glass and the straw and strawberry in the other glass.

This little guy may look a bit familiar if you saw my Father's day card I made earlier in the month. It's the same stamp set, but I had to do a little bit of DIY to make him wear a suit. The tux jacket started out as the t-shirt stamp stamped onto black card. I then cut a Y-shape out of the top so there was two seperate parts. Then I made the collars out of some scrap black card and stuck them on. It was very fiddly but I think it looks really good. The shirt and bow tie are stamps from Kanban set (you can see the full stamp set here.) The drinks were made using a stamp by Stampin Up.

Next up we have my handmade birthday cupcakes. My boyfriends loooooves Batman. Seriously, he's kinda obsessed. So I thought I'd make him some little Batman themed cupcakes for his birthday. Here's a picture of them packed up in the box.


At the top is the Batman symbol, the second row is Gotham city and the bottom row are the 'Pow!' symbols that were always used in the comics and the old Adam West Batman series.

Here's a close up of the three designs.


The Batman symbol and Gotham city cakes were decorated using fondant icing and the Pow cakes were decorated using Mexican paste and buttercream. I'm so happy with the way they turned out. I made everything by hand, the cakes, the decorations and the Mexican paste (that's what the Pow's are made of). I bought the sugarpaste but I made the Mexican paste myself using this recipe by Patchwork Cutters. If anyone does try this recipe, I found that I needed to add more water than the recipe states in order to get the paste to bind together. The buttercream recipe was kind of a mash up of two different recipes that I had. But I have to say it tasted divine! The Pow symbols and the batman symbols were all cut out by hand, and the Gotham city skyline's were cut out using this cutter from Patchwork Cutters.

As a first go at cupcake decorating by myself I think they turned out really well. And now I know what works and what doesn't, what equipment I need to buy to make life easier, and the quantites of buttercream, paste and cake mix I need for next time I make cupcakes like this.

As usual here is my list of products used.

Products used on the card -
Woolly Bears Hamish stamp set by Kanban
Happy Moments & Queue Up stamp sets by Stampin Up
Cardstock in Whisper White & Cherry Cobbler by Stampin Up
Cardstock in red & black by the Paper Mill
Silver mirror card by Create and Craft
Promarkers in Satin, Tan, Poppy, Pear, Honeycomb & Vanilla
Memento Ink in Tuxedo Black
Glossy Accents by Ranger
Word Window punch by Stampin Up

Products used on the cakes -
White Regal Ice (suagrpaste) by Renshaws
Sugarflair paste colours in Navy, Liqourice, Melon & Ruby
Mexican Paste (see recipe here)
Cupcake cases by Lakeland
Disposable piping bags from eBay
9mm open star piping nozzle
New York Skyline cutter by Patchwork Cutters
Edible glue from eBay

I really hope you all like creations today.

Bye for now


Thursday, 14 June 2012

Beautiful Butterflies

Hi everyone, hope you're all doing well?

I haven't got a card for you today...I've got some wall art! A butterfly frame piece of wall art to be precise. I've seen a few of these floating around out there on google, pinterest, ILWS, etc and here is my version.


A close up of the butterflies -


And finally a side view so you can see the dimension of the wings -


I took the glass out of the frame so the wings could stick up and the butterflies look like they're flying. I put some vanilla cardstock behind the photo board...frame...thing. (What is it even called!?) Basically I put vanilla cardstock in so that I had something to glue the butterflies onto. It blends pretty well with the white frame.

Products used -
Frame from Wilkinsons
Various scraps of card (mostly Stampin Up and the Paper Mill)
Rhinestones from Rennies Arts & Carfts
Sizzix Embosslits Beautiful Wings die


Bye for now!

Sunday, 10 June 2012

A box of cards

Hi everyone!

While I was sorting out my craft boxes a little while ago I found a project that I made ages ago. It got made nd looked all pretty but then got shoved into a box and forgotten about. After stumbling upon it I was baffled why I'd shoved it in a box in the first place! It's really pretty. Here it is for you all to have a look at -

This was made using a tutorial by the lovely Jenny Moors who creates absolutley gorgeous tutorials which are for sale on her website. It is a little folder which holds 4 small cards inside. In Jenny's tutorial she uses a stamp set called 'A Flower for all Seasons'. However, although I do own this set I used 'A Tree for all Seasons' instead. Here's a picture of the folder opened out -


The cards are 4 inch squares and the folder slightly larger at about 4.5 inches, so that the cards and the envelopes fit into the folder. All the cards are identical except for the image stamped in the middle. Each stamp is themed around one of the seasons. Here's a close up of the cards. Top to bottom, left to right is Spring, Summer, Autumn and Winter.


I have actually made another one of these, but a different size so that it fits standard C6 sized envelopes and A6 cards.

Products used, all are Stampin Up unless otherwise stated -
'A Tree for all Seasons' stamp set
Cardstock in Whisper White, Chocolate Chip & Old Olive
Chocolate Chip patterned paper (part of the Neutrals Paper Stack)
Old Olive satin ribbon
Scalloped Circle Punch
Corner Rounder Punch by Creative Memories
Stampin Write Markers (various colours)

Bye for now!


Wednesday, 6 June 2012

Scottish daddy bear

Hi everyone!

Hope you all had a nice weekend/Jubilee bank holiday despite the not so great weather at times.

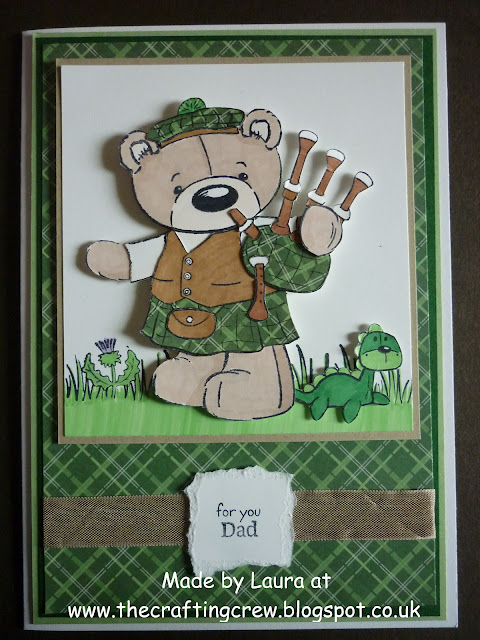
You may have seen my little shopping spree here. I decided to use the Kanban Woolly Bear stamps I bought to do my Dad's fathers day card. My Dad is Scottish so these stamps are perfect for him and I also found some tartan papers in my stash (although I'll probably get told that it's the wrong tartan for his family, but oh well). I really love this card! I'm so happy with the way it's turned out :)


The bear is made up of quite a few layers, which looks good but it does make the card quite heavy. Originally I was going to mask and stamp so that it ended up being a single stamped image on just on layer of card. But I've ran out of sticky notes so I couldn't do that. I had to stamp each image out individually, colour it, cut it out and then layer it up and stick it onto the rest of the images. I'm actually glad I did it this way because it adds a little bit of dimension.

As much as I like the card and (I adore the images!), I did have  lot of problems with the stamps because of the way they react to the ink. Normally when I'm using Promarkers I like to stamp my images in black Memento ink because it doesn't bleed when it comes into contact with the alcohol in the Promarker ink. But these stamps really do not like the Memento ink at all! The black ink kind of seperated on the stamp so I couldn't get a crisp outline no matter what I did. Anoying is not the word! In the end I just gave up and used Staz On. It does give a lovely, crisp, dark outline but it does have problems with bleeding when you use Promarkers. It's not so bad if you leave it for 10-15 minutes before you start colouring. But you still have to be careful with paler colours where bleeding is more noticable.

You can see the difference in the inks on the card. The 'Dad' is a clear stamp inked with Memento, whereas the bear, clothes etc is inked with Staz On. I think you'll agree that the Staz On looks better!

I've also entered this into the Cardmaking and Papercraft father's day challenge which you can find here and a challenge on a blog called Out of a Hat Creations which can be found here.

I absolutley adore this little bear! And I've already got a few more projects planned with this little guy so keep an eye out for them in the coming weeks.

Hope you all like the card!

Products used -
Woolly Bears Hamish clear stamp set by Kanban
Happy Moments stamp set by Stampin Up
Tartan paper by Daisy & Dandelion (part of a set called 'A Winter's Tale')
Stampin Up cardstock in Whisper White, Crumb Cake, Certainly Celery & Garden Green
Seam binding ribbon in Crumb Cake by Stampin Up
Promakers in Satin, Ivory, Tan, Cocoa, Henna, Grass, Pine & Amethyst
Memento ink in Tuxedo Black
Staz On in Jet Black

Bye for now!

Tuesday, 5 June 2012

Quilting fabrics

Hi everyone!

I've got some utterly gorgeous fabric to show you all today. In yesterdays post I showed you a cushion I made using the Stampin Up Twitterpated fabric and I mentioned that I'd bought some new fabric to do my patchwork quilt with (you can read about my quilt idea here).

I just had to show you this fabric and tell you about this amazing site I bought it from. I stumbled upon Eclectic Maker while looking for Tilda fabric. This site sells some beautiful fabrics and really reasonable prices. And just look at how lovely its packaged! I didn't want to  unfold the fabric because of how lovely it looked!

I am one of those people who love nice packaging so I was so happy with the way they the people at Eclectic Maker take the time to fold all the cloth nicely, pop a business card in and wrap every thing up rather than just chucking it in a bag. Its the little things that matter :) Anyways these are the fabrics that I'm going to be using on my patchwork quilt. I also have some plain white cotton fabric but I bought that it town because I forgot to add it to my basket when I was buying all  of these.

The fabrics are by Tanya Whelan, Moda, Patty Young and Patty Sloniger. I also got some batting for the inside of the quilt. Now I thought wadding and batting were the same thing but apparently not. Or this is what  I've told anyways, please correct me if I'm wrong! I was recently told that wadding is synthetic and usually thicker and batting is usually thin and made of natural fibres. Anyways I bought Hobbs Heirloom cotton batting. It looks quite thin, but I've not actually had it out of the packet to have a proper look yet. I'm hoping it works ok. If not I supose I'll just have to buy some more.


I'll keep you all updated on how the whole quilting experience turns out. I've never done anything like this before so it could end up being a total disaster. Finger crossed it won't though!

Bye for now !


Monday, 4 June 2012

A twitterpated jubilee!

Hi everyone!

Can't believe its June already. Where is the year going? Hope you are all enjoying the extra long weekend. I know I am! Got quite a big post for you all today!

First up is a cute little gift card I made for a friends birthday this week. It uses quite a lot of new products from Stampin Up (as always I'll put the full list of products used at the bottom of the post). I've used DSP in Twitterpated and a stamp set called Apothecary Art which goes lovely with the paper and a matching set of framelits to cut out the stamped image. Framelits are basically nestabilities but by Sizzix rather than Spellbinders.


I popped my Boots advantage card in 1) to give you an idea of size and 2) because I haven't bought the gift card yet. But gift cards are credit card sized anyways so you get the idea. I'm going to write my message above the card and I also want to add a velcro dot to keep the holder closed, because as you can see in the top picture it's kind of flapping about at the moment.

I've got another Twitterpated project to share with you know. This uses the Twitterpated fabric. You can see a picture of the fabric here. Now originally I was going to use this fabric as a part of my patchwork quilt that I'm going to be making. But I got some more fabric and felt that this didnt really go with the new stuff I'd bought. So I thought I would make myself a little cushion cover to practice my sewing machine skills :) It's not bad seeing as I haven't sewed anything since GCSE textiles! I made a flap on the back to get the cushion in and out rather than using a zip. I don't think my basic sewing skills would allow me to put a zip on it!


This is my Jubilee cake! It's actaully a christmas cake! The mix was left over from christmas so I decided to make some use of it. It tasted really nice! I got the icing in Asda, it was already pre-coloured in Jubilee colours which was helpful. The picture doesnt really show it up very well but the heart in the middle is glittered. Gotta have a bit of sparkles! This was the first ever time I had iced a cake. It was hard! It was worse because I hate marzipan with a vengeance but not using it meant I didn't have the extra thickness to smooth out the lumps and bumps that the fruit in the cake causes. But never mind. It was good for a first attempt.


I also made a few cupcakes, they don't quite follow the jubilee theme though. Well theres red and white just missing the blue haha! There's red velvet cakes on the left, and strawberry/white chocolate cakes on the right. I'm getting hungry just looking at them, too bad they're all gone now :(


Phew that was a long post wasnt it? I've put the list of products used on the gift card holder underneath.


Products used -
Stampin Up cardstock in Blushing Bride, Baja Breeze &Whisper White
Stampin Up DSP in Twitterpated
Stampin Up Stamp Sets in Apothecary Art & Basic Phrases
Sizzix Framelits in Labels Collection
Memento ink in Tuxedo Black
Promarkers in Poppy, Pastel Pink, Blossom, Pear Green & Cornflower

Hope you all enjoyed the post today. Bye for now!


Sunday, 3 June 2012

I've been shopping...

Hi everyone!

I've been shopping again (whoops!) I've got some lovely new stamps and yet more promarkers! I got 6 stamps from Lili of the Valley, 1 from Kanban, 6 new sets of promarkers (plus 4 single pens), 2 promarker cases, some fabric (which I'll show in a seperate post) and some pinking shears from Fiskars. Phew!

First up in the Lili of the Valley stamps. I've seen loads of people use them on the internet but I've never actually tried them out myself. I took the plunge and bought 6 stamps. The designs are far too cute to pass up on! They each come in a little clear bag, and they are unmounted so you just get the rubber image, nothing else. One of mine needed a bit of extra trimming to get rid of the excess rubber but the others were all fine.

Because they're unmounted you've got to find something to stick them to to be able to use them. On their website Lili of the Valley suggest using a glue stick to stick the stamps onto a clear block. That way the stamp can be peeled off and washed when you're finished, and the block/stamp won't be ruined. I didn't have a glue stick to hand to I just used some repositionable tape runner on the back of the stamp and then stuck it onto a clear block. It works but I want to get some EZ Mount Foam to make the stamps cling to the blocks on their own. Below is a photo of all 6 stamps quickly stamped onto card. From left to right on the top row first is 1) Teddy flower 2) Teddy - For mum 3) Thomas big bunch of flowers 4) Little nurse 5) Rosie Posy 6) Close your eyes. All of these stamps are £4.50 each and can be found here


Next up is a clear stamp set from Kanban. Now I don't really like clear stamps. I haven't had the best experiences with them in the past due to them not stamping properly, falling off the block etc. But I've never tried Kanban and I loved the design so I thought I'd try it. This set is called Hamish and I think the little bear is just adorable!

I'm going to use this set to make my dads Fathers day card (my dad is Scottish in case you hadn't guessed). I'm pretty sure that I've got some tartan paper somewhere in my craft box which would go really well with this set. I'll be sure to post the card once it's finished :)

I'm going to colour him in with Promarkers, which leadds me onto my next purchase. Hobbycraft had yet another sale on Promarkers (they really need to stop doing that, my poor bank balance can't handle it!) So me being me and being a Promarkers obsessive I got a "few" more sets....ok I got 6!

There are 3 sets of 5 pens,which are Skin Accents, Hues and Modern Textiles and then 3 sets of 10 pens plus 1 fineliner which are the Comic Art 1, 2 and 3 sets. I then also bought 4 single pens from my local Rennies Art and Supplies shop, 1 of which was a replacement for a colour I got in one of the sets because the bullet nib wouldn't work. I got the cases from eBay.


I now have a total of 84 Promakers including 2 blender pens, 3 fine liners and 14 doubles (which is what happens when you buy sets, it's cheaper but you end up with a few of the same colours). I've organised them all into colour families and marked the side of each case so I know what colours are in each case. My mum was laughing at how organised I am haha!

Last but not least is my pinking shears. These are by Fiskars and I bought them to do my patchwork quilt with. Fiskars is a very well known brand and it is a brand that I trust as I have had Fiskars scissors in the past and they have lasted years. But they were expensive. I guess you get what you pay for though, if you want quality it costs more.

That's all for my little shopping trip now. I can't wait to start using all of these things!

I've got another post to put up later of a projects using sizzix embosslits. So come back later and check it out.

Bye for now


Related Posts Plugin for WordPress, Blogger...